Showing posts with label Pink Paislee. Show all posts

Tuesday, June 19, 2012

Altered Frames

Hi friends!
Have been trying to organize some of my photo folders and ran across photos of these altered frame projects that I had worked on a while back so thought I'd share...


I started with these plain, wood framed mirrors and using some matte Mod Podge, patterned paper, paint, rub-ons and various other embellishments, this is what they turned into...


This paper from the Sassafras Lass 'Mix and Mend' collection is one of my all time favorites! Lovely texture and lots of vintage goodness. The Pink Paislee Vintage Vogue spool button and pattern tissue paper worked perfect with it to create the pretty little cluster of embellishments in the bottom corner!


I used a lot of different papers, stickers and rub-ons on the second frame for lots of texture and more of a collage feel (and a fantastic way to use up the scrap stash!!)...


These were such a fun project to work on. Since both of those were donated to a fundraiser, I guess I'll have to make myself another one! Think I'll go get my paints out and get messy...
xoBC

Monday, October 31, 2011

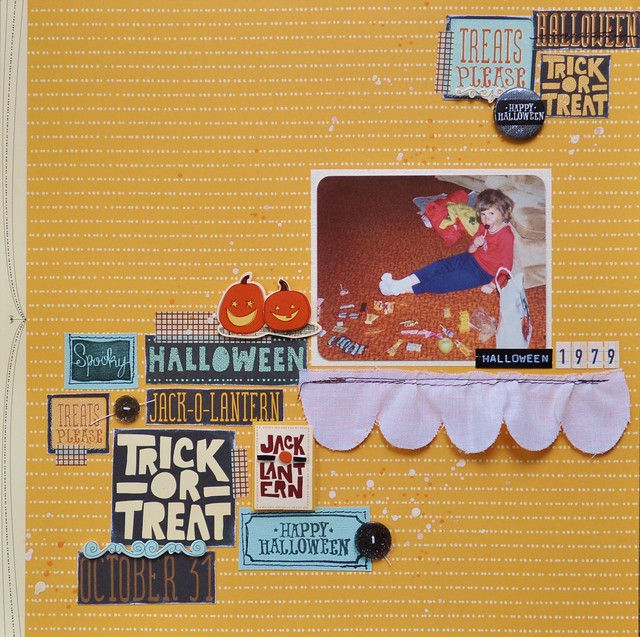
Happy Halloween, Friends!

Wishing you a boo-tiful day, full of LOTS of treats and not so many tricks!


(This layout was created with the super fun 'Hayrides and Halloween' kit from Citrus Tree Studio.)
xoBC


Saturday, August 6, 2011

Happy Weekend!

Hi sweet friends!
Hope you're having a happy, relaxing and creative weekend. Sorry I've been quiet this first week of August...I've been busy playing with some fabulous new Hip 2B Square Hip Kits and will share those projects in the next couple of days.

Last week I snuck in a few minutes of fun in my studio to create some projects for the July challenges over at Citrus Tree Studio. Mara's Color Challenge was to use yellow, green and red. The Pink Paislee Hometown Summer line is perfect for this challenge...


Some of the patterned paper from this Hometown Summer line, along with a bit of October Afternoon 5 & Dime made for a sweet little card.


Daniela's Designer's Choice Challenge was to create a card using patterned paper, a die cut or punch and ribbon. Here are two cards that I came up with from scraps from my stash.

Totally love the red, robins egg and pale green color combo of this card...and the limited edition numbers stamp from Studio Calico! I made the flower die cut with the Give A Hoot cricut cartridge and the 'lovely lady' sentiment is a sticker from My Mind's Eye.


And one more card...using some super sweet patterned paper from Pebbles Inc.,  a card from We R Memory Keepers, a sticker & some ribbon from American Crafts and a Martha Stewart sweet little butterfly punch.


I love how these challenges jump started my creativity and that these cards took no time to put together, but were so satisfying to create! Do hope you get to sneak in some fun creative time in your studio/craft room this weekend, my friends.
xoBC

Wednesday, July 27, 2011

Cards, Cards, Cards

Hi friends! Happy Wednesday to you!
Just popping in to share some of the cards I created with the May Hip Kit.


My Minds Eye patterned paper, Crate Paper border sticker & button, Studio Calico Wood Veneer star (love these stars!)


October Afternoon & Pink Paislee patterned papers,
BasicGrey Details star embellishment and
EK Success border punch.


American Crafts Rocky Road & Powder cardstock,
Studio Calico blue graph Tweets Rub-Ons,
BasicGrey Hello Lucious Ribbon Doilies
and an SRM Sentiment Sticker from my stash.

Jillibean Soup Watermelon Gazpacho patterned paper,
a mix of Sassafras Sweet Treat stickers and BasicGrey Life of the Party petals,
a Basic Grey Life of the Party Small Details embellishment
and a super cute tag from Studio Calico's State Fair collection.


And here are a couple card variations based on this Card Maps Sketch the Design Team used this month...


My Minds Eye & Pink Paislee patterned paper, Studio Calico Wood Veneer Star
and American Crafts cardstock.
I sprayed the naked star with Studio Calico Mister Huey in School House Red and
covered it with Martha Stewart's fun vintage-like glitter.
The sentiment is a Stampin' Up stamp from my stash.


Crate Paper & Pink Paislee patterned paper,
Maya Road wood button, Basic Grey Life of the Party Petal blossom
and American Crafts cardstock in Cricket & White.

Thanks for stopping by!
See you real soon!
xoBC

Saturday, July 16, 2011

Some Happy Hip Kit Projects

Playing with the May Hip Kit from Hip 2B Square was such fun! Here are a few of the layouts that I created with this delightful kit...


On this layout I used Studio Calico's Mister Huey in Schoolhouse Red & Lunch Tray to create the star background. A package of Studio Calico's wood veneer stars is included in this kit, so after I punched out the star shapes, I used the negative for a mask, then added a bit of machine stitching to give the stars some texture.


On this double page layout I didn't have enough of the Studio Calico State Fair patterned chipboard alphabet to finish my title, so I mixed it up a bit and added a few sparkly Thickers from my stash which worked out great!


I love how these pinwheels turned out when I used the 'All Systems Go' patterned paper from the October Afternoon Rocket Age collection and the adorable Crate Paper buttons...so fun!


I love the look of mixing different fonts and alphabets together. Here's my take on that technique with the title on this layout. (This layout is a lot brighter in person, so bear with me, as I continue to try to master photographing projects. Our Pacific Northwest weather doesn't help the lighting any!)


Love these State Fair Die Cut Tags from Studio Calico. So bright and fun!


Thanks for letting me share, friends! Hope you're having a happy and creative day!
xoBC


Thursday, July 14, 2011

Happy Birthday, Little Birdie Secrets!

My friends over at Little Birdie Secrets are celebrating three years of crafty goodness!


Today, I have the pleasure of helping them celebrate with some card inspiration. There's even a little giveaway...which includes my five handmade cards plus a few extra papercrafting goodies from me that you can use to add to your own birthday card stash!


So go wish Little Birdie Secrets a happy birthday and check out the deets on the giveaway here!
xoBC

PS...Not to be misrepresented, I am not currently designing for Citrus Tree Studio as my DT term was up in April, BUT I do love Citrus Tree Studio and all my friends there AND you can find loads of inspiration from the new design team! xoBC

Monday, June 6, 2011

A Little Birdie Told Me

As I mentioned back in March, I had the pleasure of taking Christy Tomlinson's online She Art Workshop. That girl is amazing! I completely admire her - she's uber talented & oh so sweet! I am so grateful to have experienced her online class & learned soooo much. Creating on canvas is such fun...and a fabulous stress reliever!

The March Hip Kit included some of this Pink Paislee tissue paper...
(Oh how I love the fresh spring green color and those happy polka dots!)


The March Hip Kit also included this awesome Pink Paislee Daily Junque paper...


With these supplies, I was completely inspired to create this little canvas...

A Little Birdie Told Me...

be positive.
be true.
be grateful.
be organized.
be on time.
be proactive.
be resolved.
be yourself.
be amazing.
be kind.


I started with matte finish Mod Podge and a blank 6x6 canvas (not the 4x12 that's in these first two photos) and covered the canvas with the Pink Paislee tissue paper. The beauty of the tissue is that it can be smoothed out for a nice flat background on the canvas or you can create some texture by leaving a few wrinkles in the paper, here and there. Plus, I love that a bit of the texture of the canvas can still be seen through the tissue...


While the Mod Podge dried, I cut out elements from the fabulous Daily Junque paper...


...and then 'auditioned' them on the canvas until I figured out how I wanted it arranged.


I selected my acrylic paints...


...and simply squirted a bit of paint directly on my canvas.


Rather than using brushes, I took an old handy dandy Starbucks card and spread the paint around. You can easily scrape paint off or add more with the edge of the card. (I use this technique to add paint to layouts & cards too...since you can get a super thin, almost transparent, layer of paint on a project this way, without any brush strokes showing.)


I started with a cream color paint & then added a bit of blue.
Here you can see the texture that the paint created over the top of the tissue...


Plus a bit on the edges...


Once the paint was dry I used the Mod Podge to attach the paper elements, gave the entire canvas a coat of Mod Podge to seal it all and then glued on the twig after wrapping a bit of twine around it.


I do love how it turned out! So simple. So fun. Wouldn't that make a sweet gift?

Cheers to getting paint under your nails and Mod Podge in your hair!
Wishing you a creatively messy day my friends...
xoBC

Wednesday, June 1, 2011

Remember Me?


Hi friends! Happy June! June...Oh my...have I really been MIA for that long?!?
Blogging to me is sorta like exercise, if I get in a good routine it just becomes second nature...but boy, it is soooooo easy to slip and get out of the habit! So...THANK YOU, friends who have not forgot about me. Friends who have checked back continually, then nudged me and said 'what the heck are you up to?!?' and 'are you ever going to blog again?!?' For you I am so very, very grateful...thank you for your support & encouragement to share what goes on in my crafty world!

With that said...I've got some catch up sharing to do!
For today, going to share a few projects that I created using the March Hip Kit from Hip 2B Square. This was such a fun kit to work with...a perfect kit to kick-off spring. Colorful paper, fabulous embellishments...a kit sprinkled with products from Pink Paislee, Studio Calico, My Mind's Eye, Echo Park, Jillibean...some of my favorites!

I absolutely LOVE the Pink Paislee House of 3 'Daily Junque' collection (it was one of my favorite lines from CHA!). With the pretty colors & collage elements, this paper really does all the work for you!


I added some dimension by using some extra pieces I cut from other papers in the kit with a few pop dots, a few fun embellishments & some Studio Calico Mister Huey in 'AppleJack' and 'Lunch Tray' - which was part of the March Add-On Kit. I have a big crush on Mister Huey right now...it's by far my favorite misting ink!


For my journaling spot, I just stitched a few random lines...and left the thread tails to match the 'messy' style of the page. Totally love that old photo of my sis and I & the vintage vibe of the 'Daily Junque' paper is perfect!


Here are a few of the cards I created using elements from the Pink Paislee papers...


Did I mention that I have a crush on Mister Huey?? On this next layout, I used some 'School House' red Mister Huey to color the Studio Calico wood veneer hearts & to create the negative 'A'. The color saturation of this Studio Calico mist is fantastic...and it doesn't warp the paper like so many other mists do.


Tomorrow I'll share a couple more layouts & a couple more cards that I created with this March Hip Kit...plus a small canvas piece that I made with some of the new Pink Paislee tissue paper & Daily Junque line!

Wishing you a very happy & creative day...
xoBC